How to Integrate N3uron with Bivocom Ubuntu Gateway TG465
1. Introduction
In today’s interconnected world, the seamless integration of IoT devices and platforms is crucial for optimizing smart applications and enhancing operational efficiency. The N3URON platform, known for its robust capabilities in IoT data management and analytics, can be effectively paired with the Bivocom Ubuntu Gateway TG465 to create a powerful data collection and processing solution. This integration allows for real-time monitoring, control, and automation across various sectors, making it an ideal choice for businesses looking to harness the potential of IoT technologies.
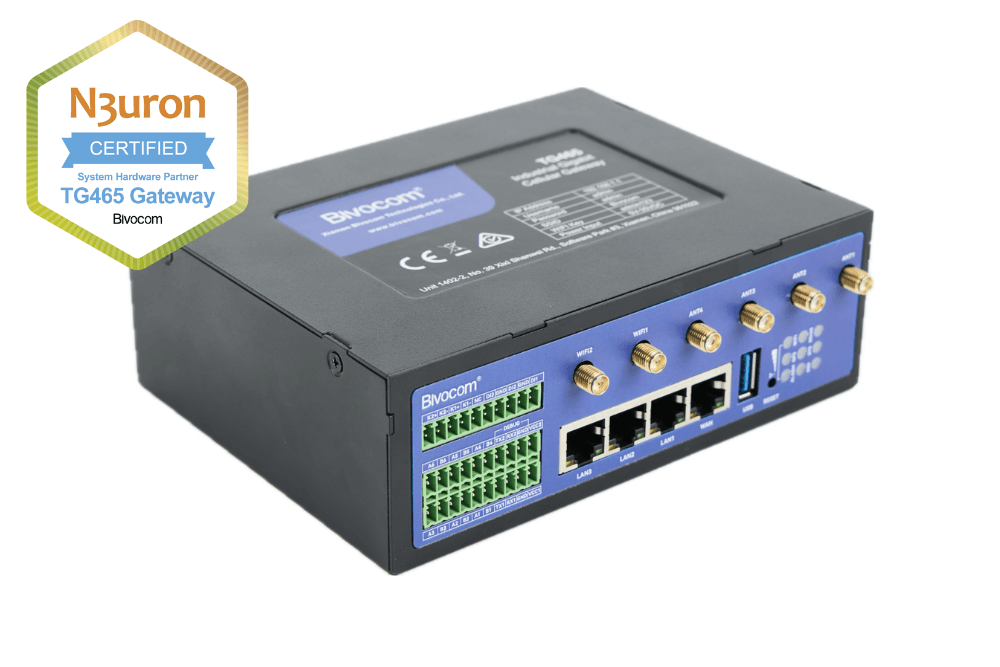
The Bivocom TG465 gateway, equipped with Ubuntu OS, offers versatile connectivity options, including 5G NR, 4G LTE, I/O, RS232. RS485, Ethernet, and Wi-Fi, GPS, Bluetooth, facilitating the smooth transfer of data between devices and the N3URON platform. By leveraging the TG465’s capabilities, users can easily connect sensors and devices to the N3URON ecosystem, enabling comprehensive data analysis and better decision-making.
In this guide, we will explore the steps required to successfully integrate the N3URON platform with the Bivocom TG465 gateway, highlighting key configurations, communication protocols(DNP3, MQTT), and best practices to ensure a smooth and efficient setup.
1) Bivocom Ubuntu Edge Gateway TG465
N3uron requires TG465 with Ubuntu built in to install. If you don’t have Ubuntu firmware built in, please contact Bivocom support team to assist.
2) N3uron Industrial Edge Platform
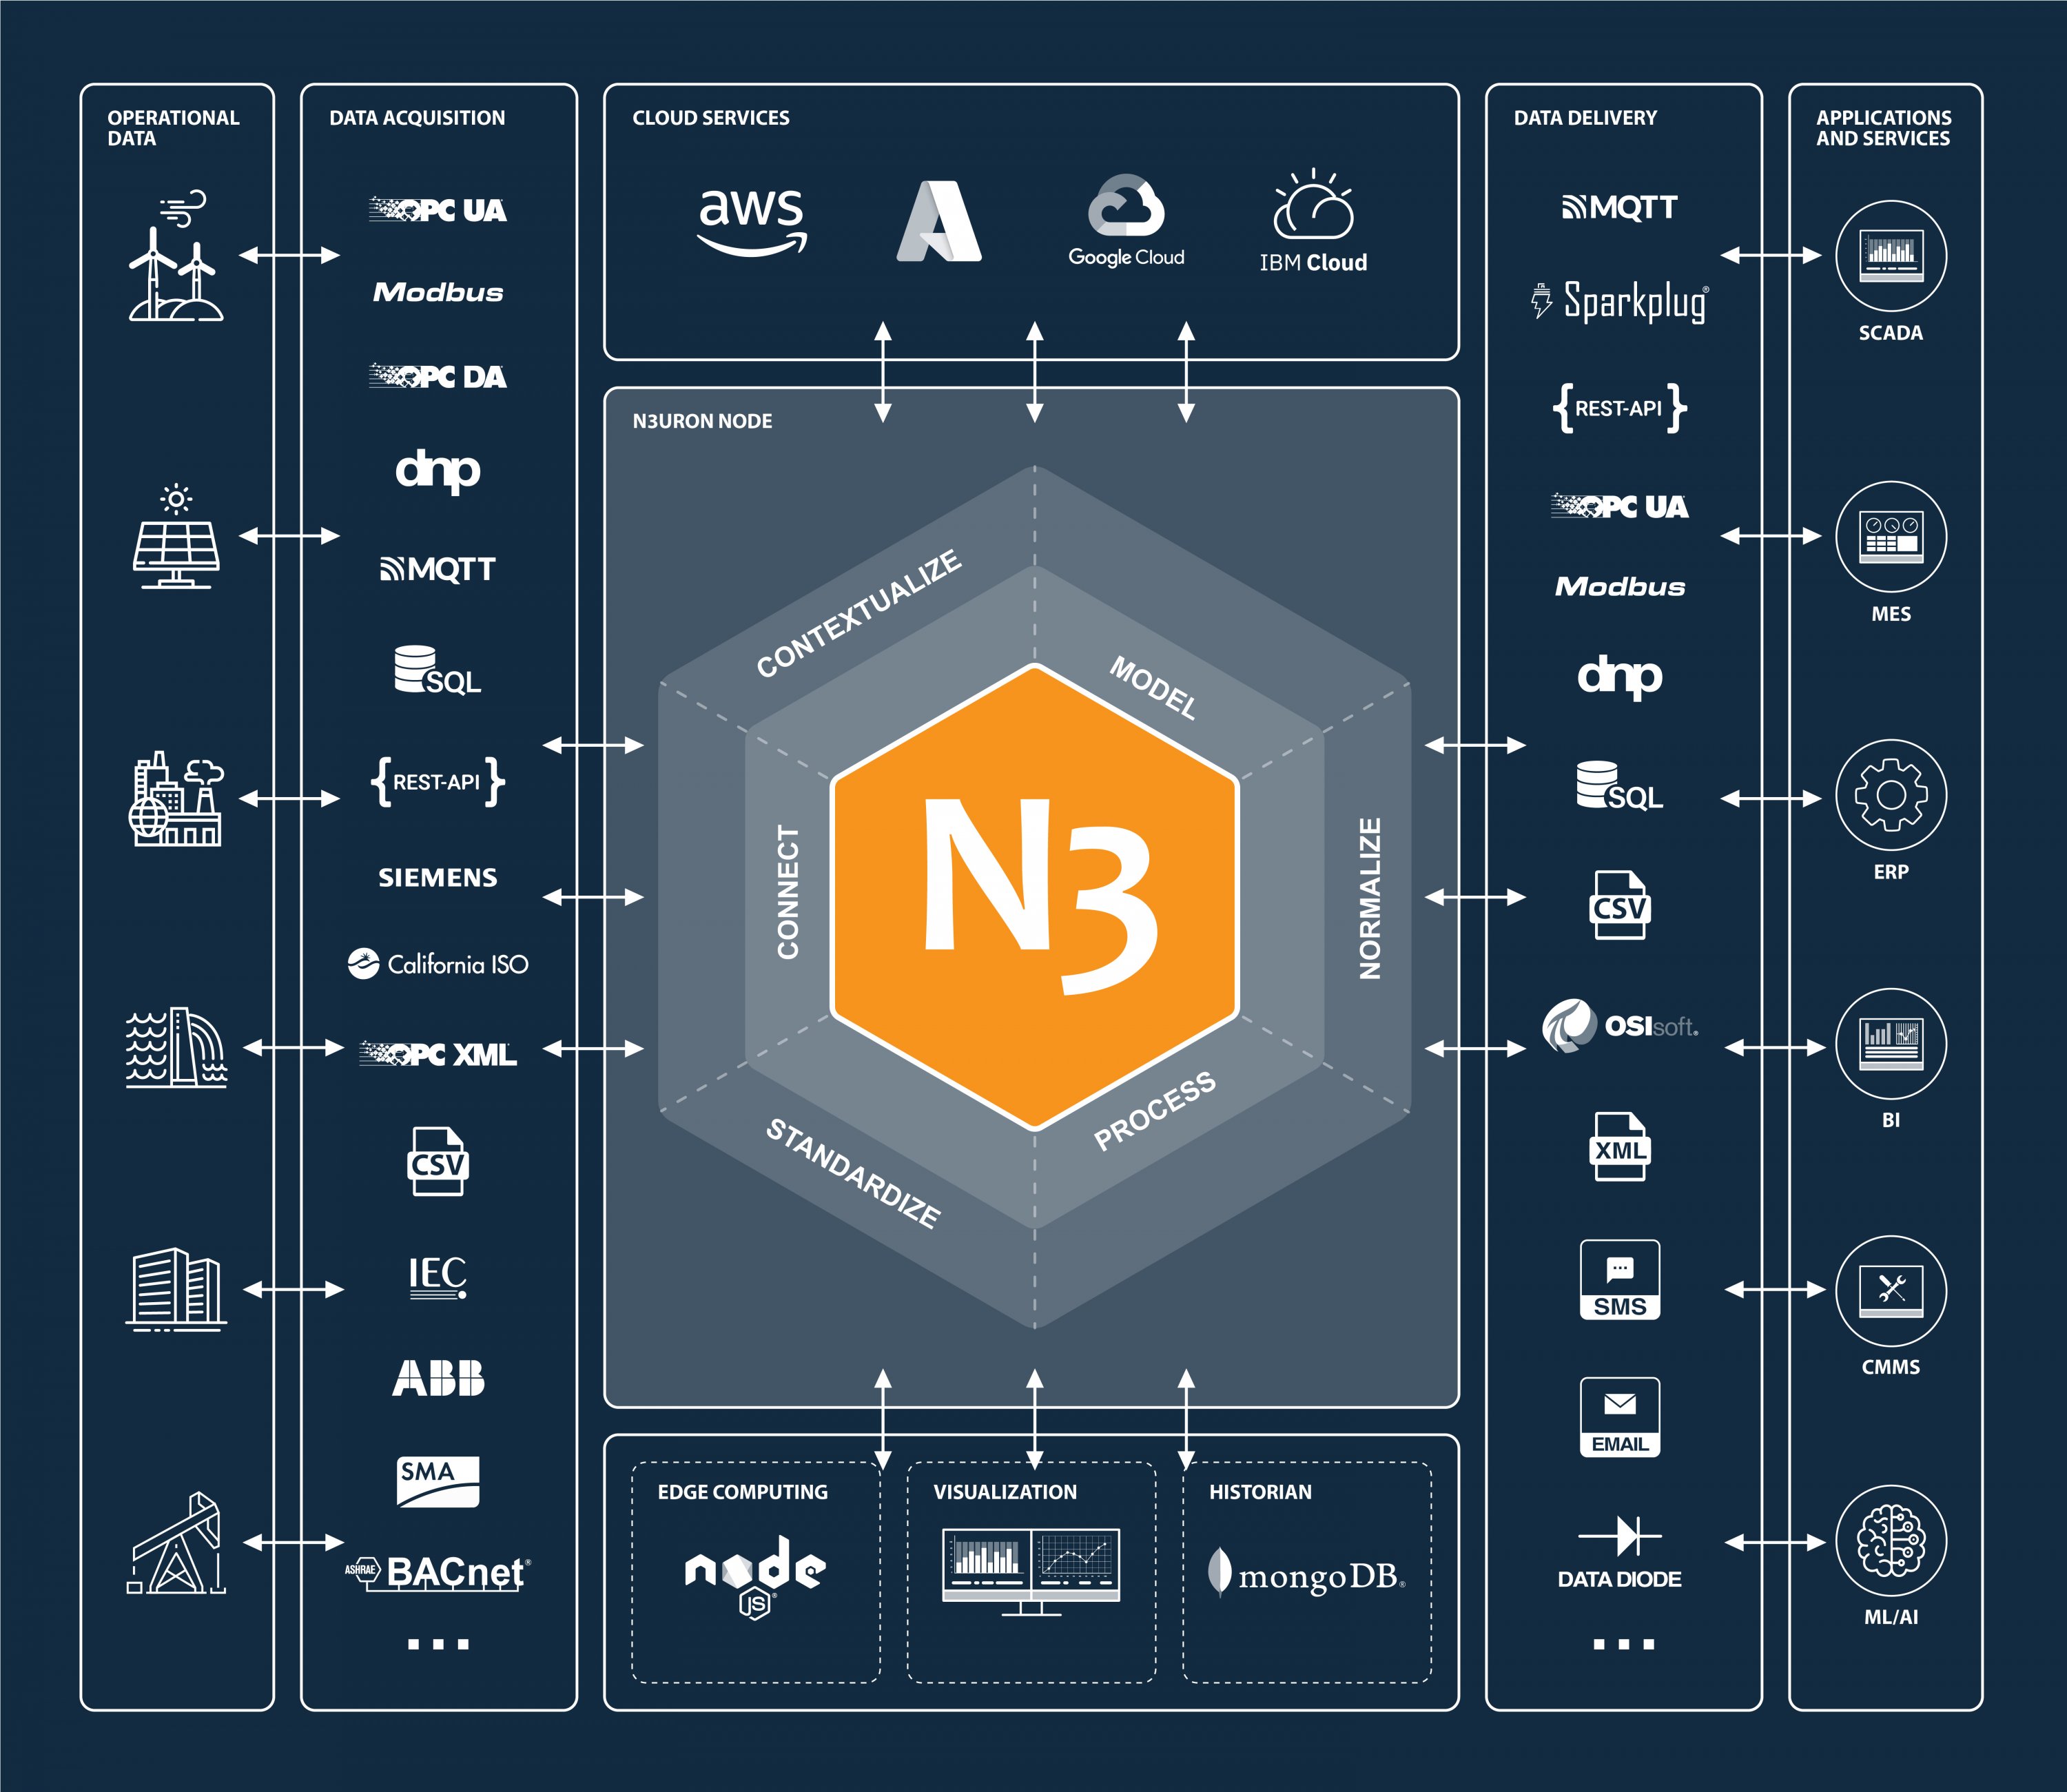
N3uron software is an Industrial Edge Platform for IIoT and DataOps that streamlines the flow of data between industrial systems and business applications, either on-premise or in the cloud. N3uron provides an out-of-the-box solution for data standardization, normalization and contextualization, seamless integration with industrial and IT systems, efficient information management, and unparalleled scalability and security. The N3uron platform makes it easier for operations teams to aggregate, manage and analyze industrial data, resulting in enhanced productivity and informed decision-making. Whether you’re looking to optimize your operations, reduce downtime or improve product quality, the N3uron platform is the answer.
The Industrial IoT & DataOps Platform
Link: https://n3uron.com/
2. Steps
1) Installation:
N3uron can be easily installed with our one-step automated installation script. Before proceeding with the following steps, please verify that your gateway is connected to the internet. Additionally, we assume that you connect WAN port to internet by network cable connection.
Step 1: First you need to gain access to the CLI by terminal.
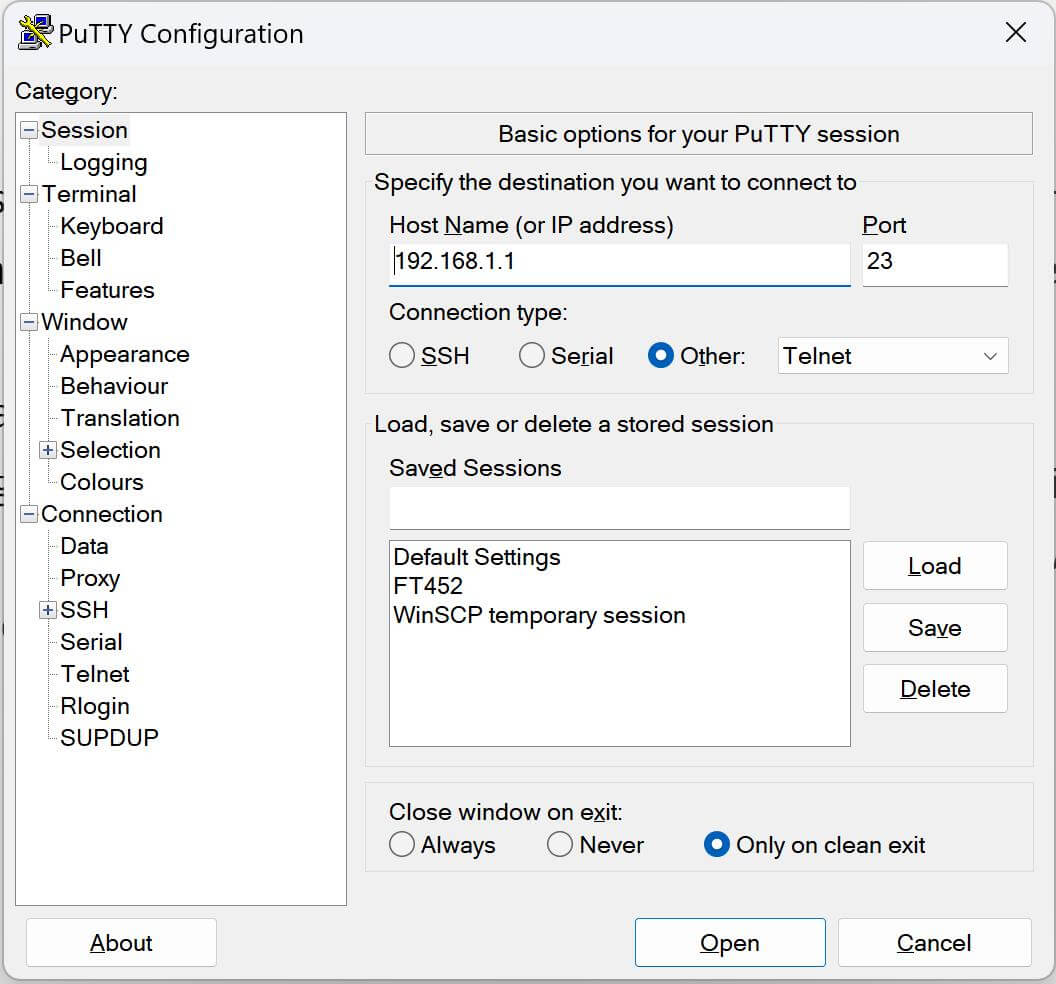
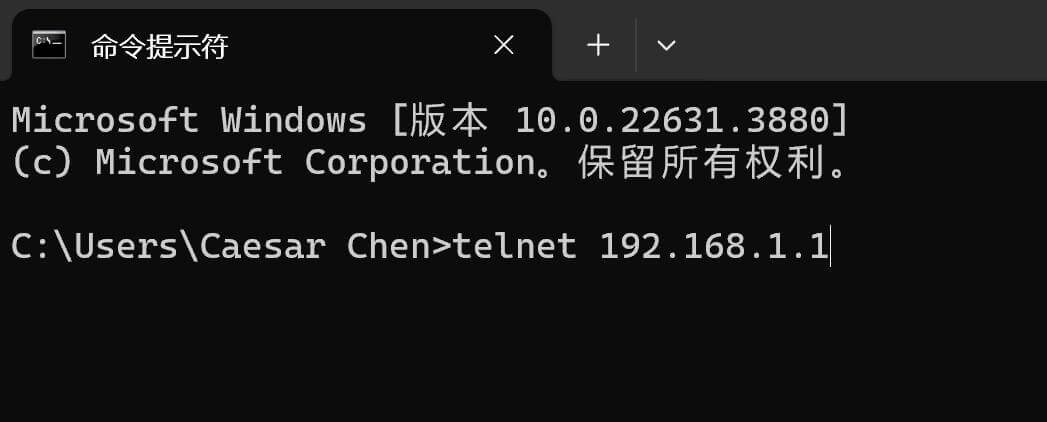
Telnet: If your PC is configured to automatically get an IP address, it will obtain the IP address from the TG465 DHCP. Otherwise, make sure your PC can connect to the network 192.168.1.0 (255.255.255.0). Then telnet login with “192.168.1.1” by Putty or terminal. Default username and password are both “admin”.
Step 2: Installing N3uron with one-step automated installation script.
curl -fsSL https://get.n3uron.com/install.sh | sudo bash
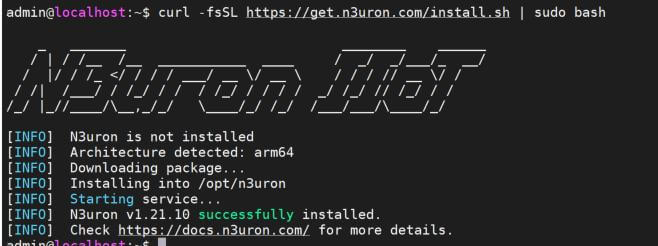
In a few seconds you’ll have N3uron installed, up and running.
2) Usage
N3uron was designed with a microservice-oriented architecture in which each module runs as an independent process and Bootstrap is the core service that manages the rest of the processes. By default, the WebUI module is automatically activated, making it accessible as soon as the installation is complete, additional functionalities are enabled creating new module instances.
Each module requires a valid license to run in production mode. If a module doesn’t find a valid license, it will run in demo mode for two hours. In order to restart the demo period, the module must be restarted.
3) Configure DNP3 Client on WEB UI
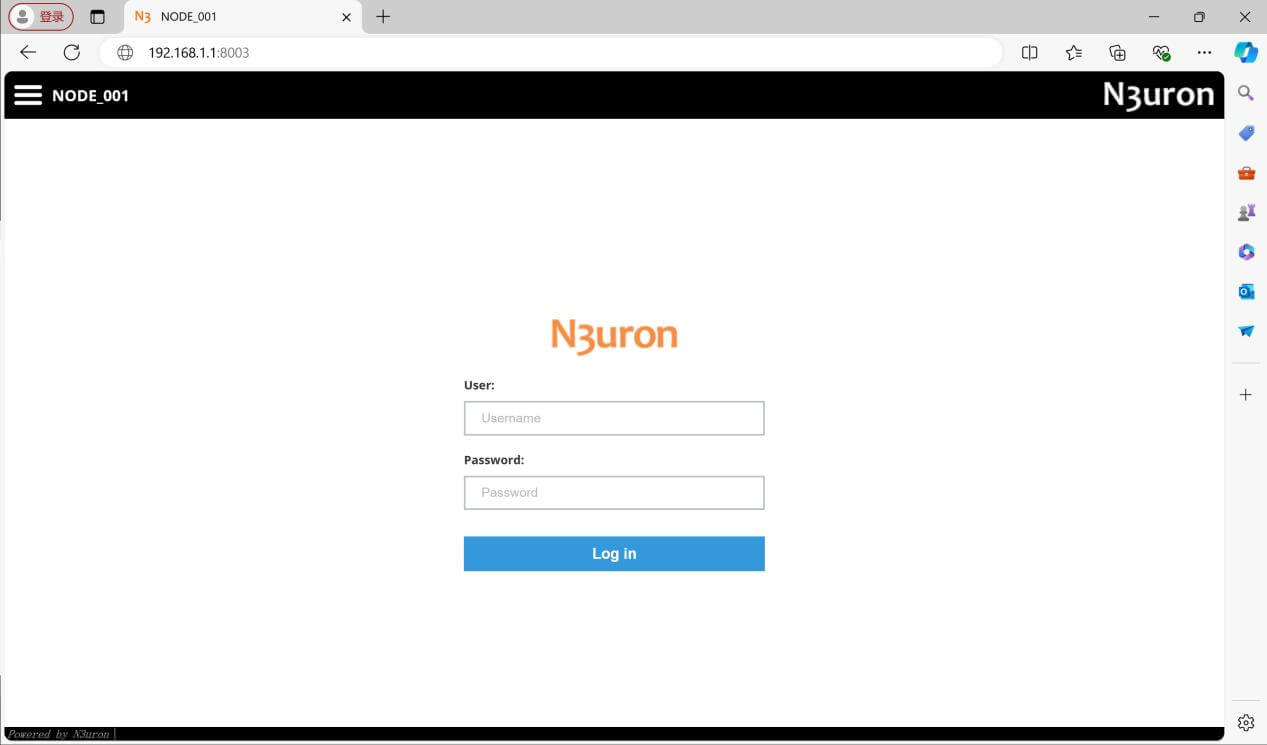
Step 1 : Please open your favourite browser on the local network to access the N3uron WebUI, use the TG465’s IP address(192.168.1.1) and the port that was configured for the WebUI (by default 8003 for HTTP or 8443 for HTTPS).
Default N3uron WebUI users:
| Full access | Read-only access | |
| User: | Admin | user |
| Password: | n3uron | n3uron |
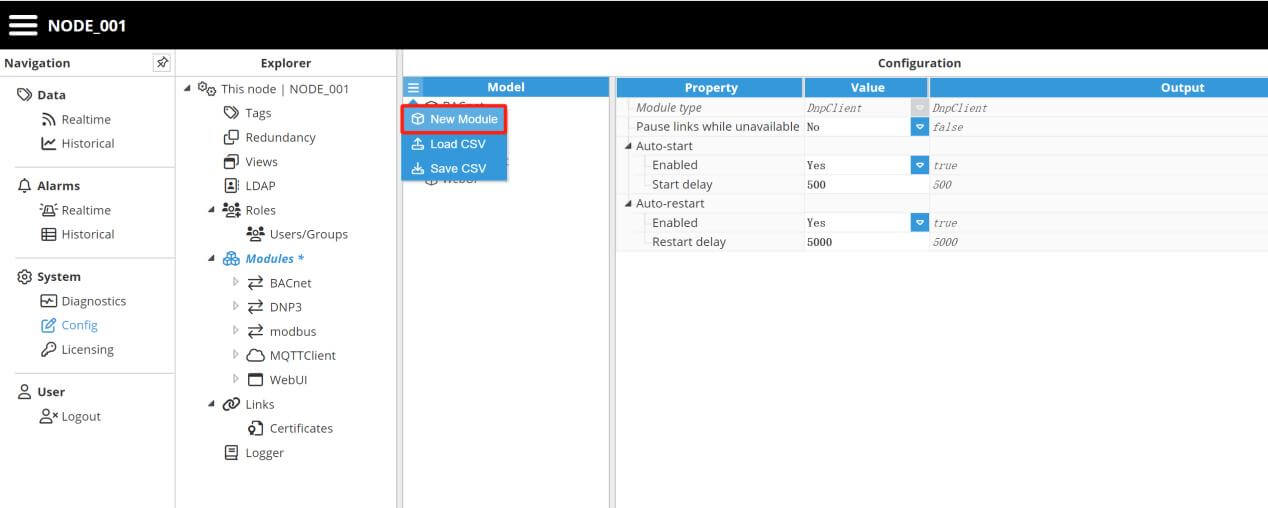
Step 2 : Open the N3uron WebUI and navigate to Config→Modules, click on the menu and then create a New Module, we’ll name it DNPClient.
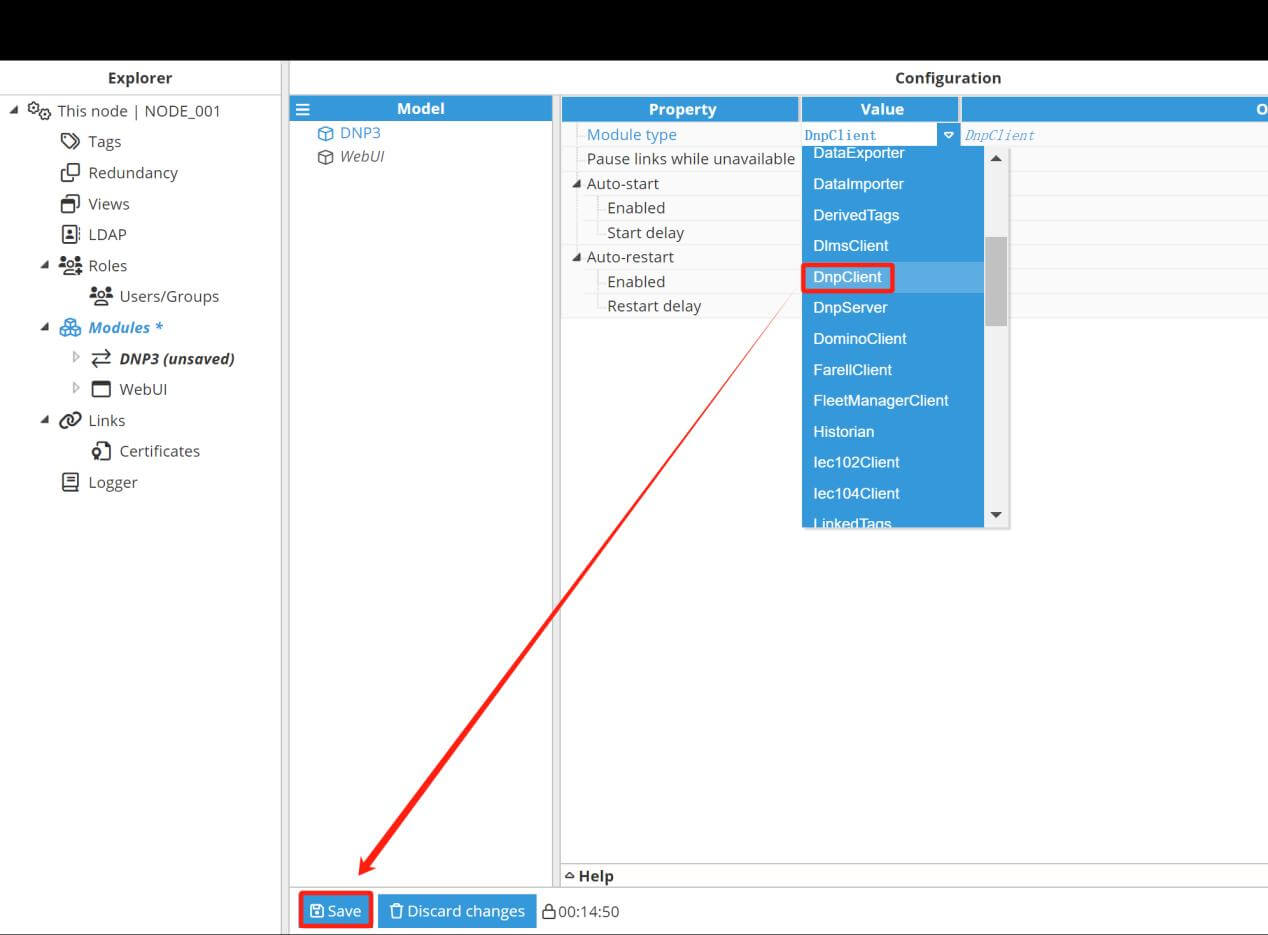
Step 3: Select DnpClient as module type, then click on Save button below to instantiate the module.
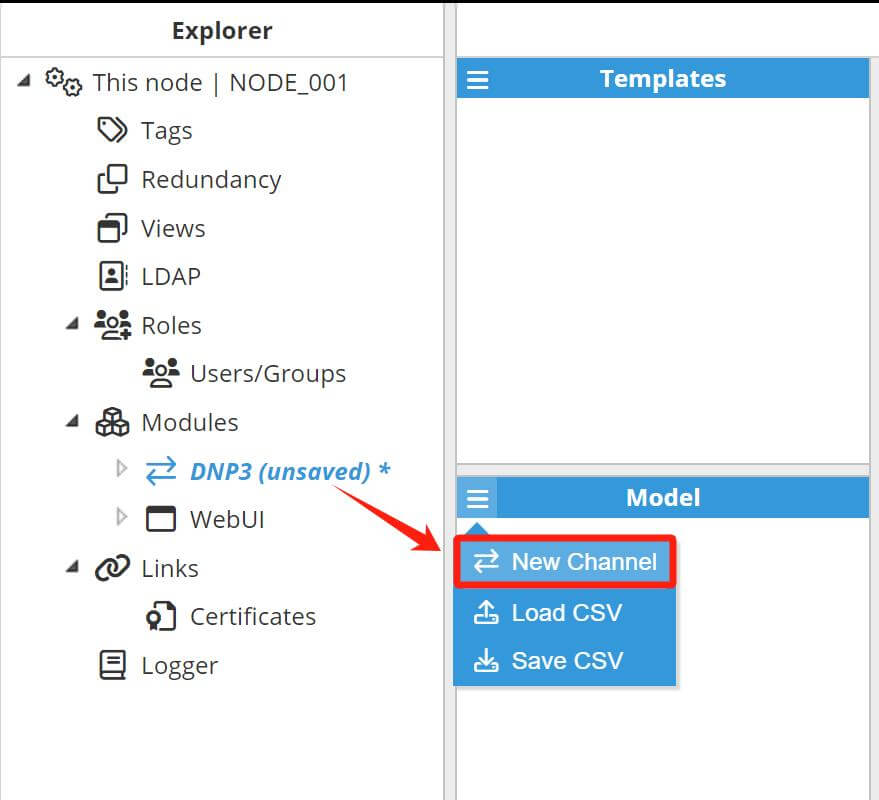
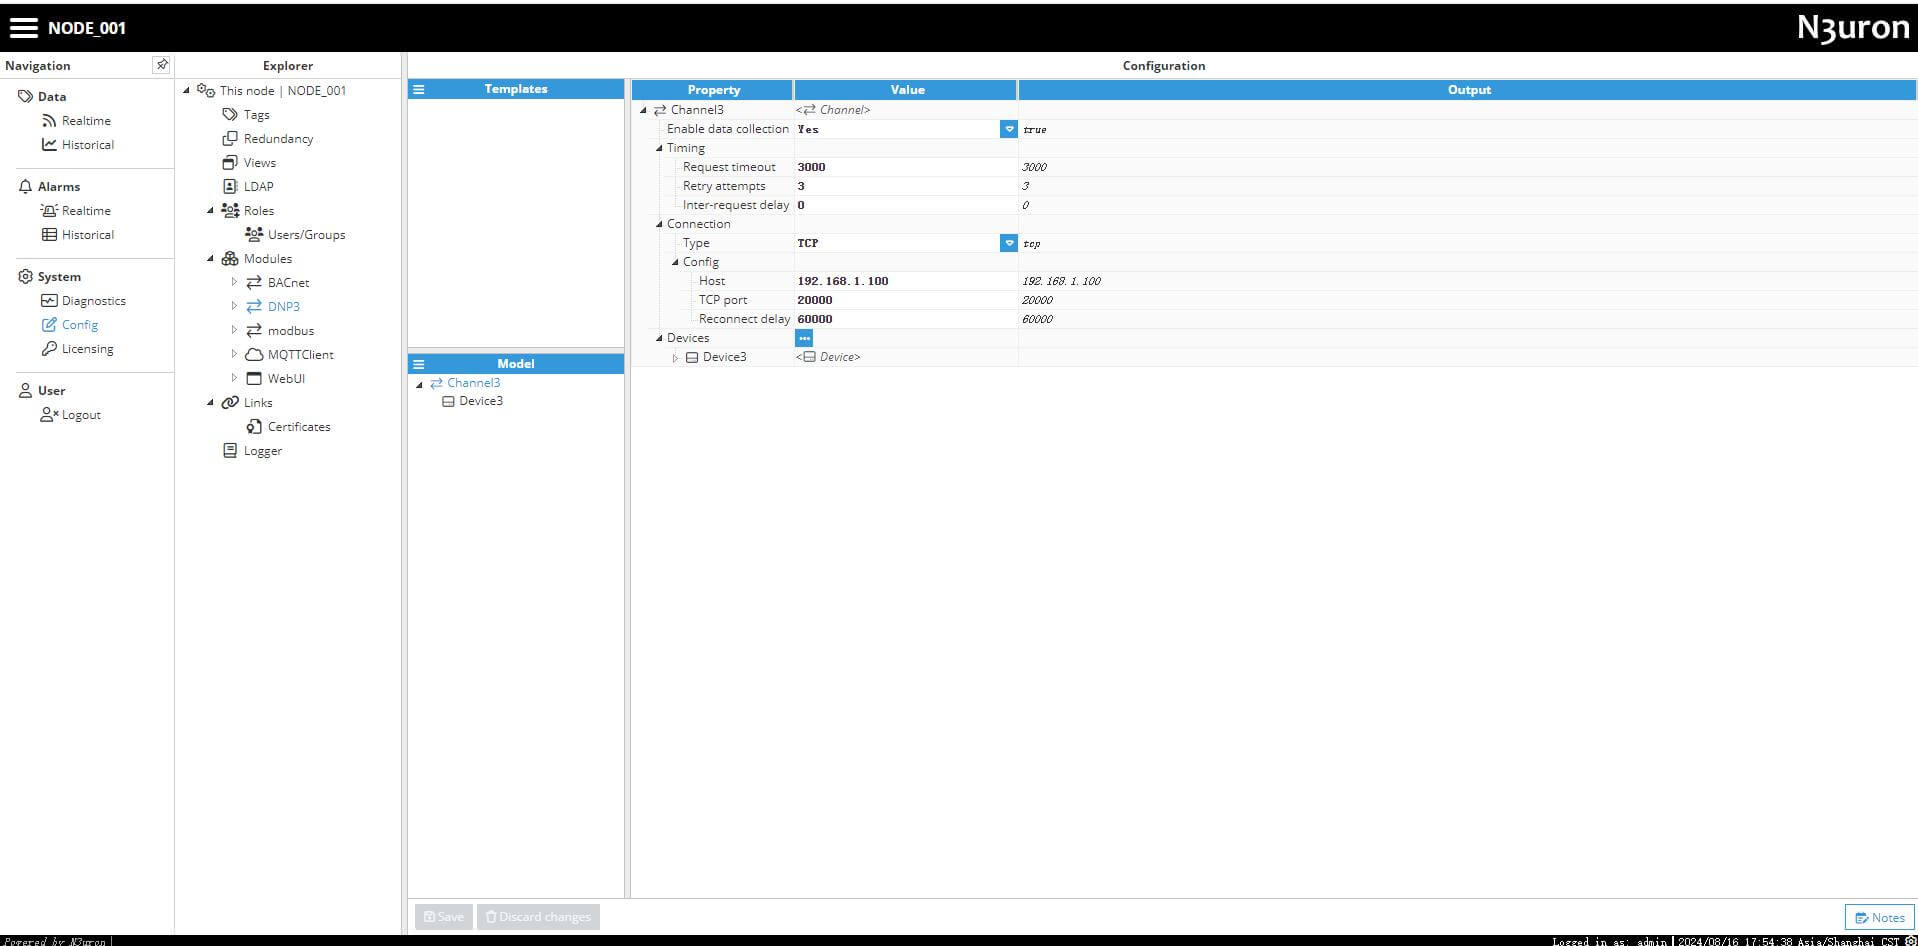
Step 4: The newly created module will appear under Modules, click on it and navigate to its configuration can create a New Channel, we’ll name it Channel3.
A channel represents the physical medium of connecting one or more devices. Each channel requires the following parameters:
Enable data collection: When disabled, the channel will remain inactive. The default value is set to Enabled.
Timing:
- Request timeout: Maximum time spent waiting for a valid response, displayed in milliseconds. The valid range is 100ms to 600000ms. The default value is 3000ms.
- Retry attempts: Number of reconnections retry before considering the target device unreachable. The valid range is 0 to 100. The default value is 3.
- Inter-request delay: Delay before sending the next request to the target device, displayed in milliseconds. The valid range is 0ms to 600000ms. The default is 0ms.
Connection:
Type: Defines the connection type
TCP: Connects via a TCP socket.
Serial: Connects via a serial port.
At this case, we are using Axon Test locally to simulate DNP3 Server, so we set as below:
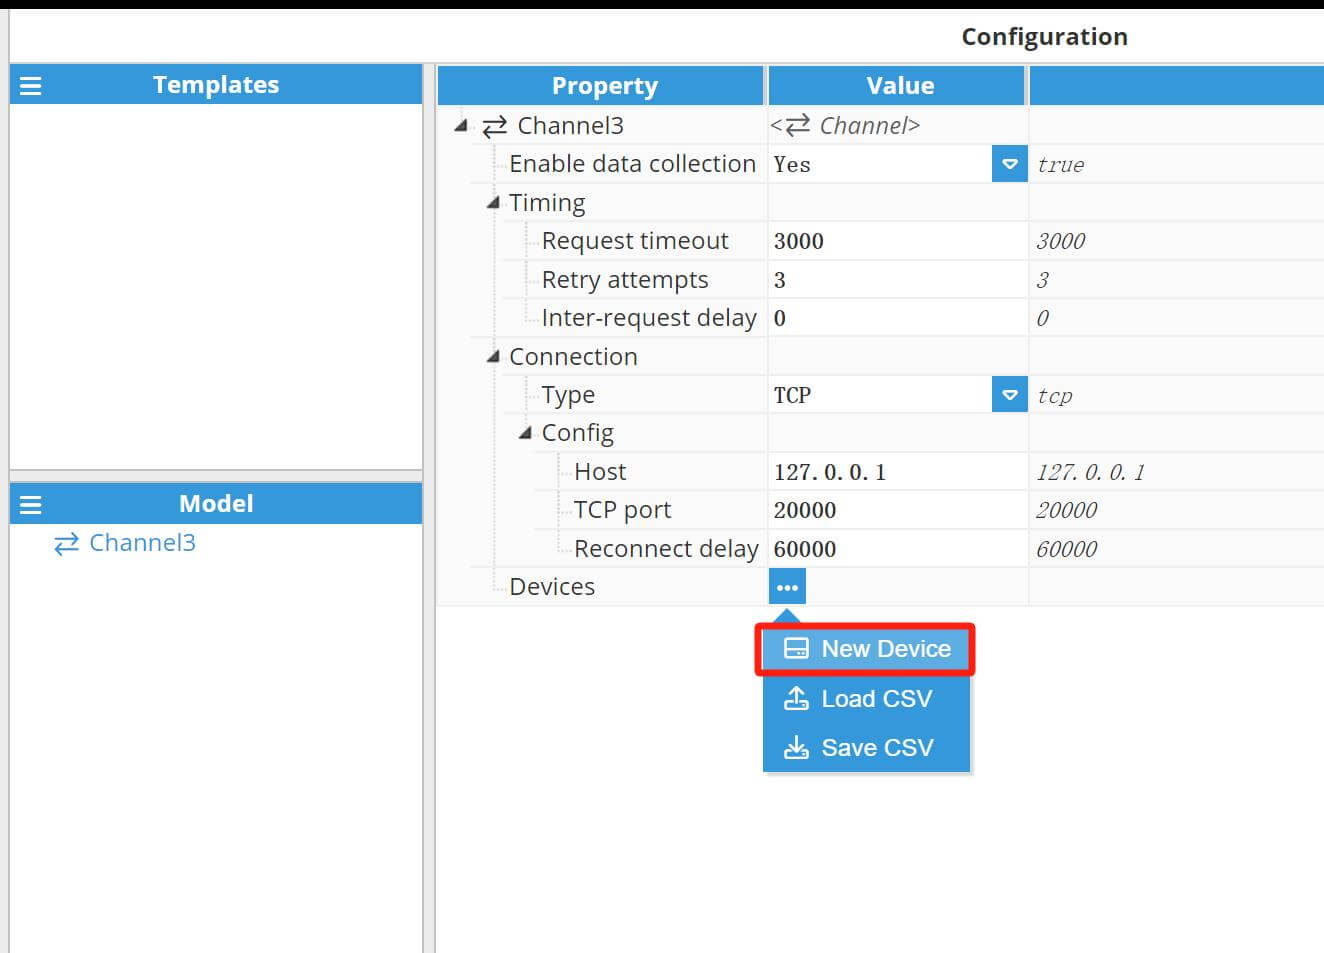
Step 5: Click on to add a new device, here we name it Device3.
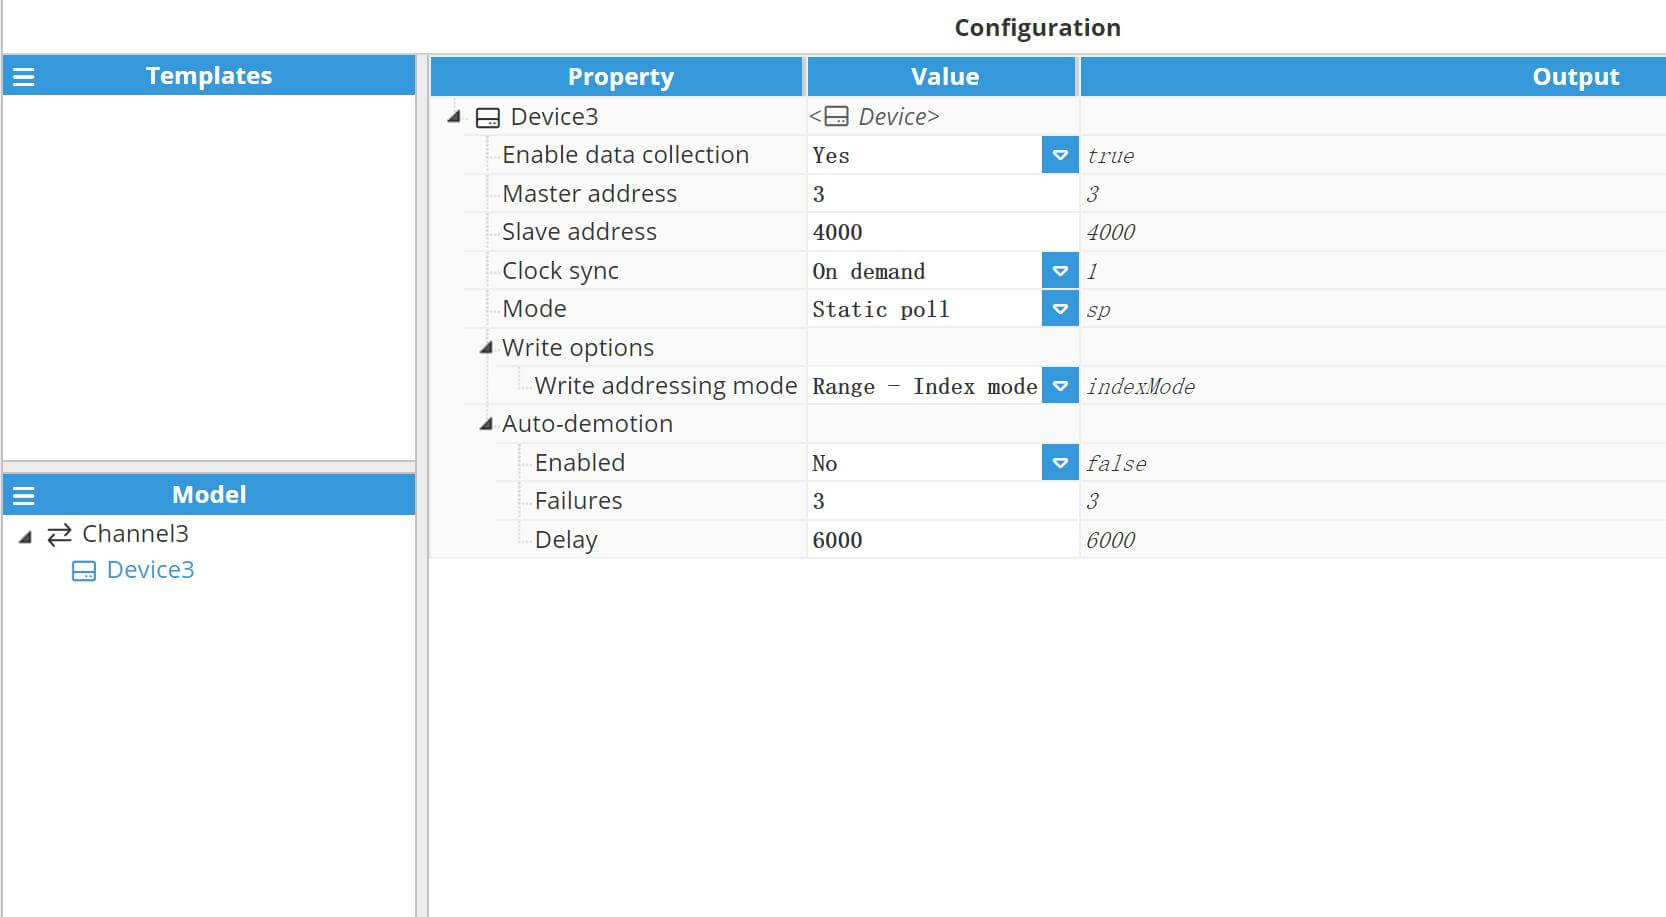
The newly created device will appear under Channel, click on Device3 to enter configuration page, then setup the parameters corresponding to Axon Test.
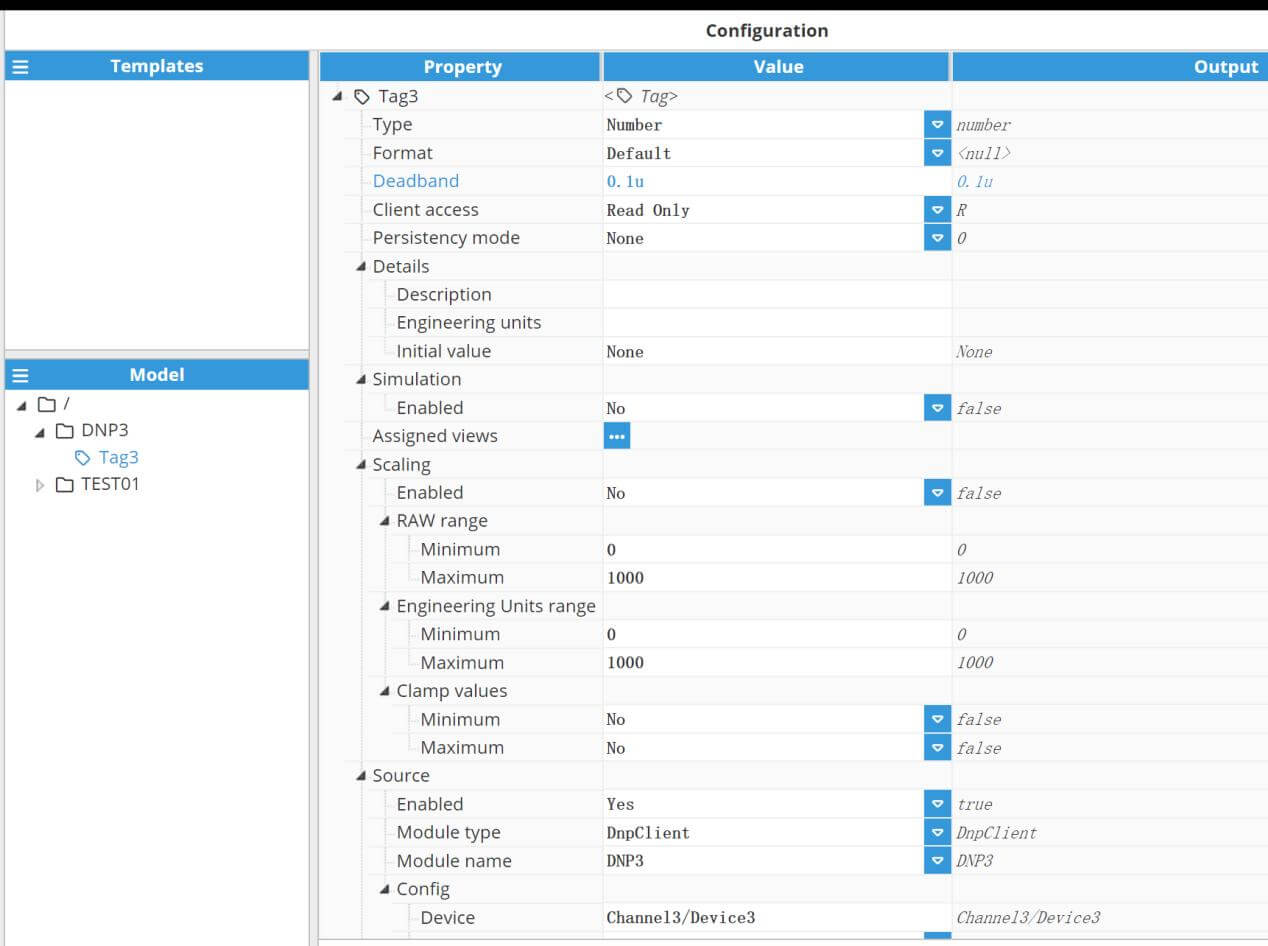
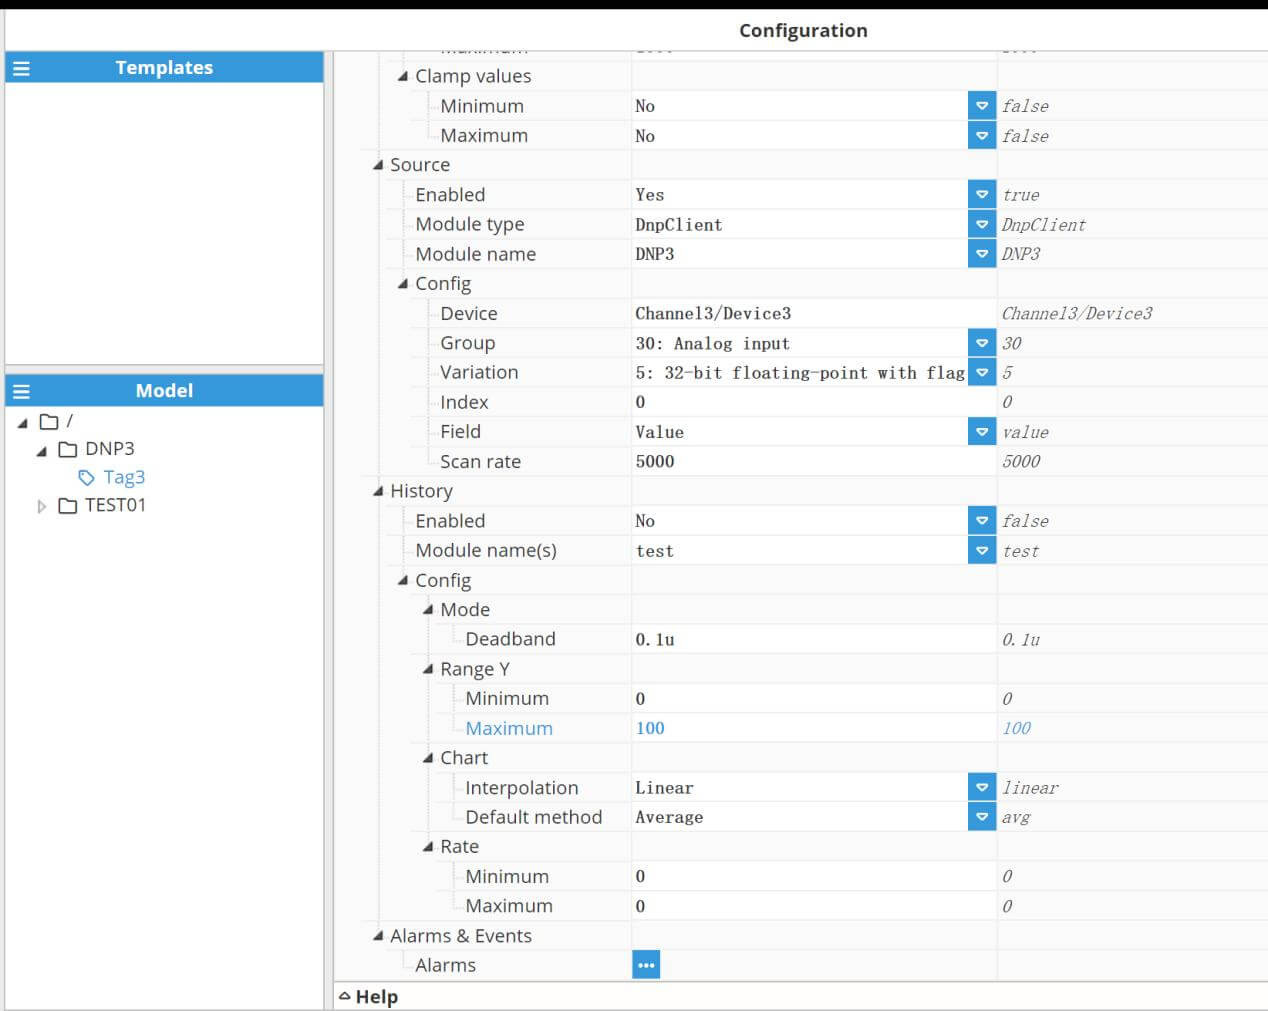
Back to Explorer, enter Tags page to add a New Tag, here we name it Tag3, then setup the parameters follow DNP Server settings.
Source configuration settings contain the following parameters:
- Enabled: When disabled, tags will not be updated with the values received from the device, but instead, will essentially act as memory tags. When set to enabled, the tag value will be continuously updated with the values received from the field device. The default value is set to Disabled.
- Module type: Defines the driver type used to retrieve values from the field. In this example, DnpClient must be selected from the drop-down menu. If DnpClient does not appear in the drop-down menu, this means that this driver has not yet been installed on this machine and must be installed.
- Module name: Defines the instance of the DNP Client created.
- Config:
- Device: This is the device that has already been created in previous steps to act as the data source. It should be referenced in the following format: channel/device.
- Group: Defines the tag’s data object group according to the DNP3 specification. The following groups are supported:
01: Binary input
03: Double-bit input
10: Binary output
20: Counter
21: Frozen counter
30: Analog input
31: Frozen analog input
40: Analog output
50: Date and time
- Variation: Defines the tag’s data type according to DNP3 specification. For zero variation, the data format will be provided by the DNP3 slave. Variation is only applicable to the Value field and therefore does not apply to Flag or Timestamp fields.
- Index: Defines specific data objects in a given group. Indexes start with 0 for each object group containing multiple points. Essentially, this is the tag address.
- Field: Certain object group variations in the DNP3 protocol will return multiple data items, such as Value, Flag and Timestamp.
- Value: The value of the specified point
- Flag: A byte containing the full set of transaction flags (0 through 7) for the specified DNP point.
0: Online
1: Restart
2: Communications Lost
3: Remote Force
4: Local Force
5: Overrange
6: Reference Check
7: Reserved
- Command mode: DNP3 command to be used for write requests.
5: Direct operate. Send requests to a remote device requiring acknowledgment from the device..
6: Direct operate no-ack. Send requests to a remote device without requiring acknowledgment from the device.
- Timestamp: The timestamp of the specified event.
- Scan rate: Poll interval for the specified tag, in milliseconds. The minimum value is 100ms. Only applicable when the device mode is set to static polling.
Step 6: Change the configurations of Tag as seen in the following example:
4) Configure DNP3 Slave
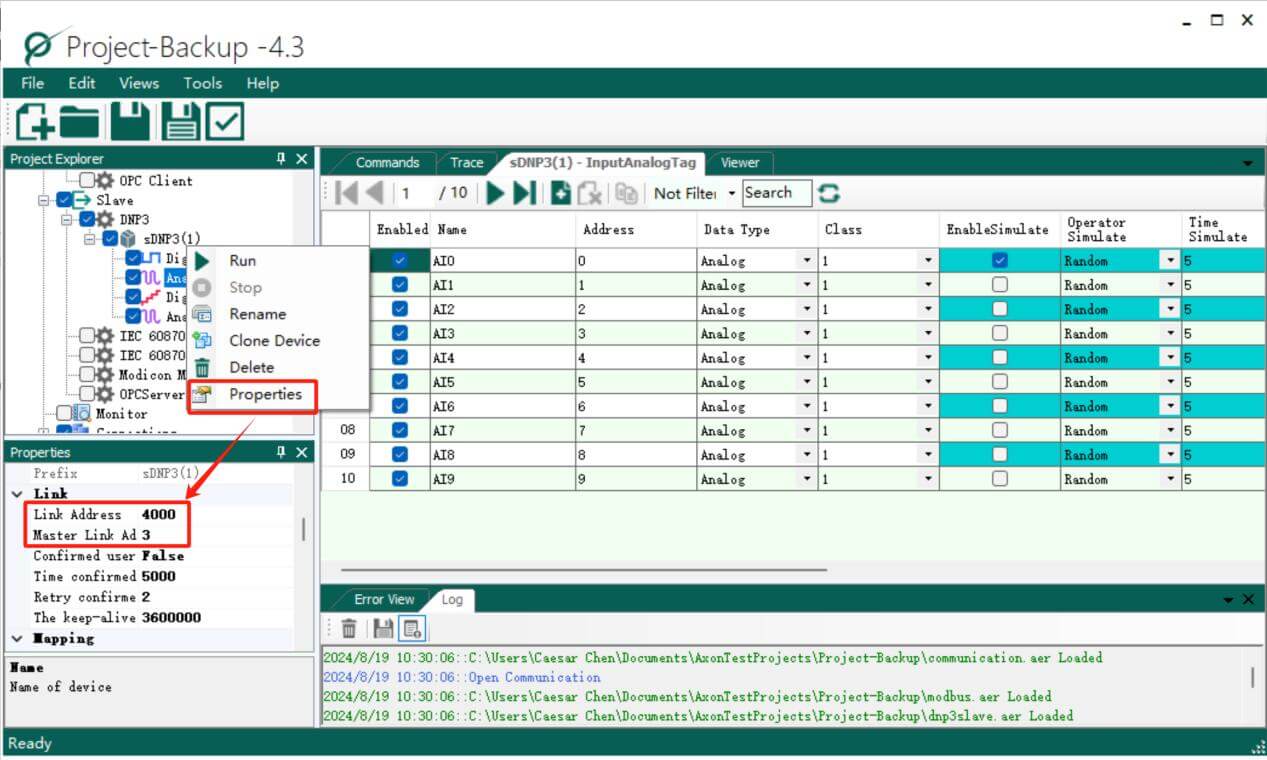
Step 1: Enable DNP3 Slave, right click on sDNP3 to open Properties, then we should set Link Address and Master Link Address reverse from the previous setting at N3uron.
Axon test: https://axongroup.com.co/eng/productos/axon-test-en/
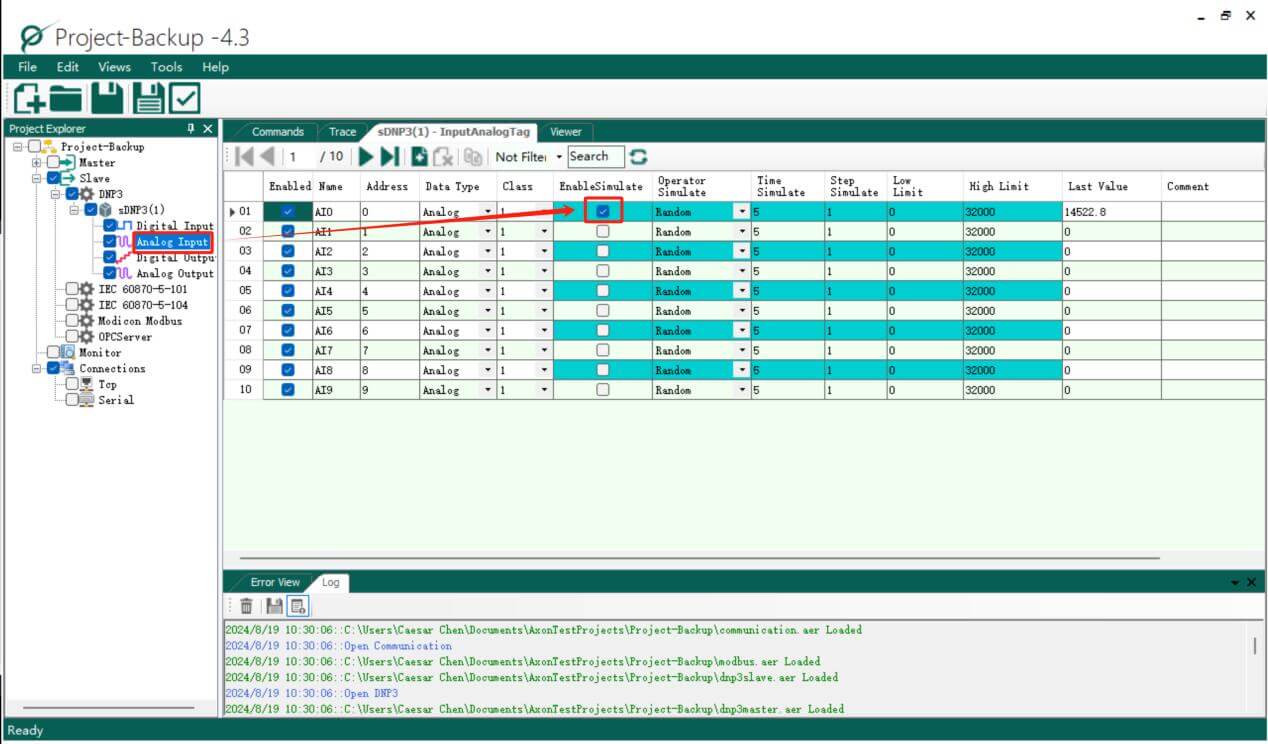
Step 2: Double click on Analog Input to Enable Simulate, it can output simulator value to DNP Client.
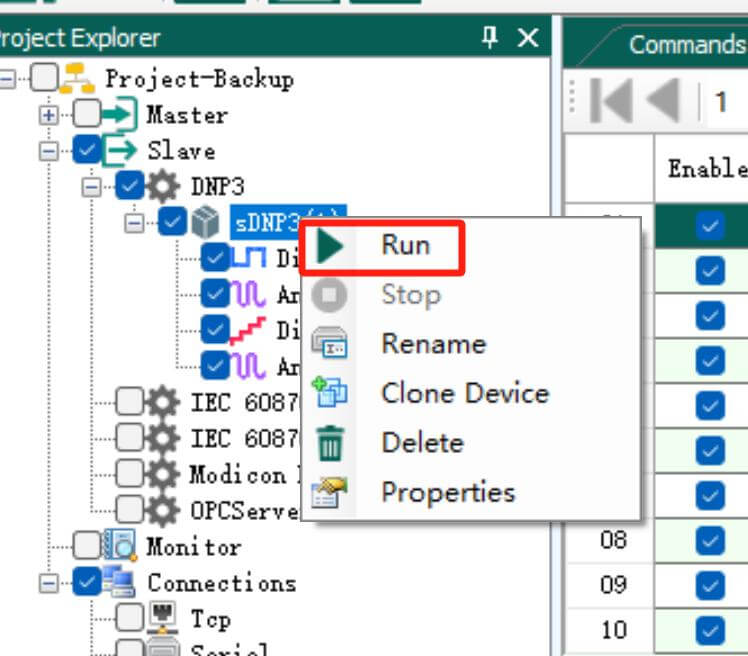
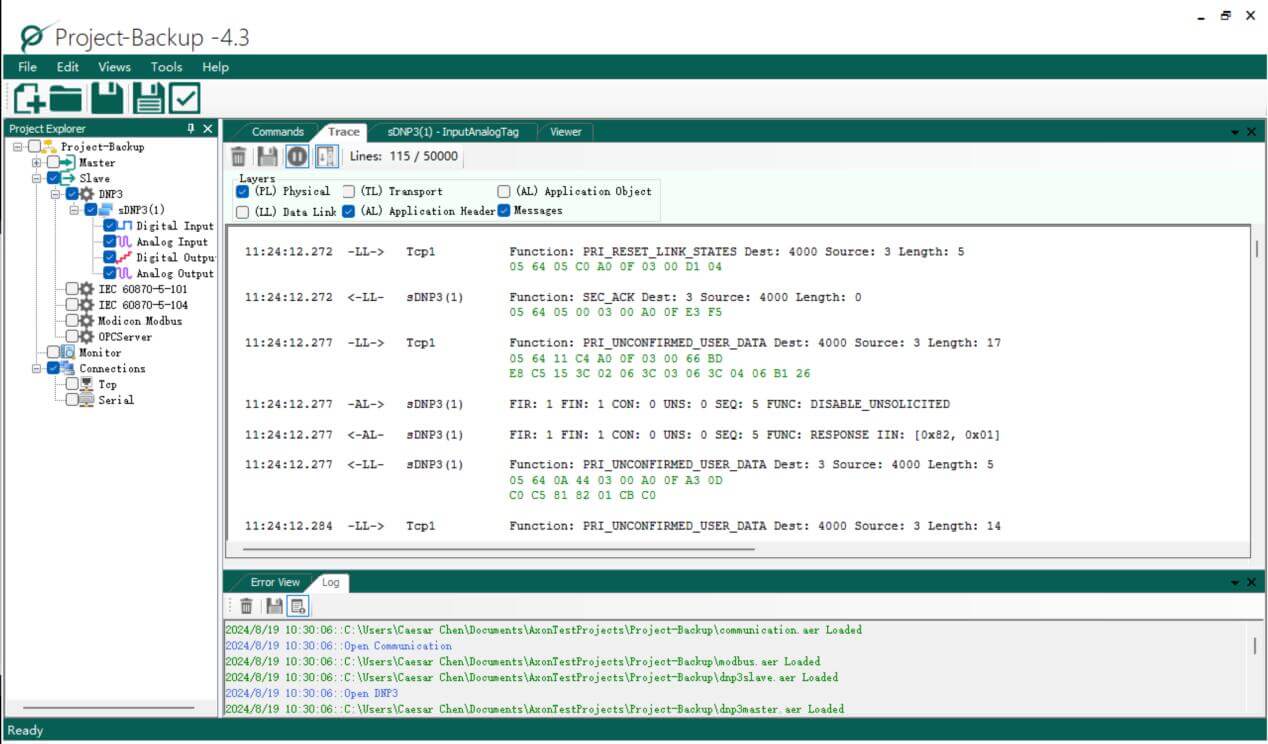
Step 3: Right click on sDNP3 and Run this module, then we can check the communication details at Trace.
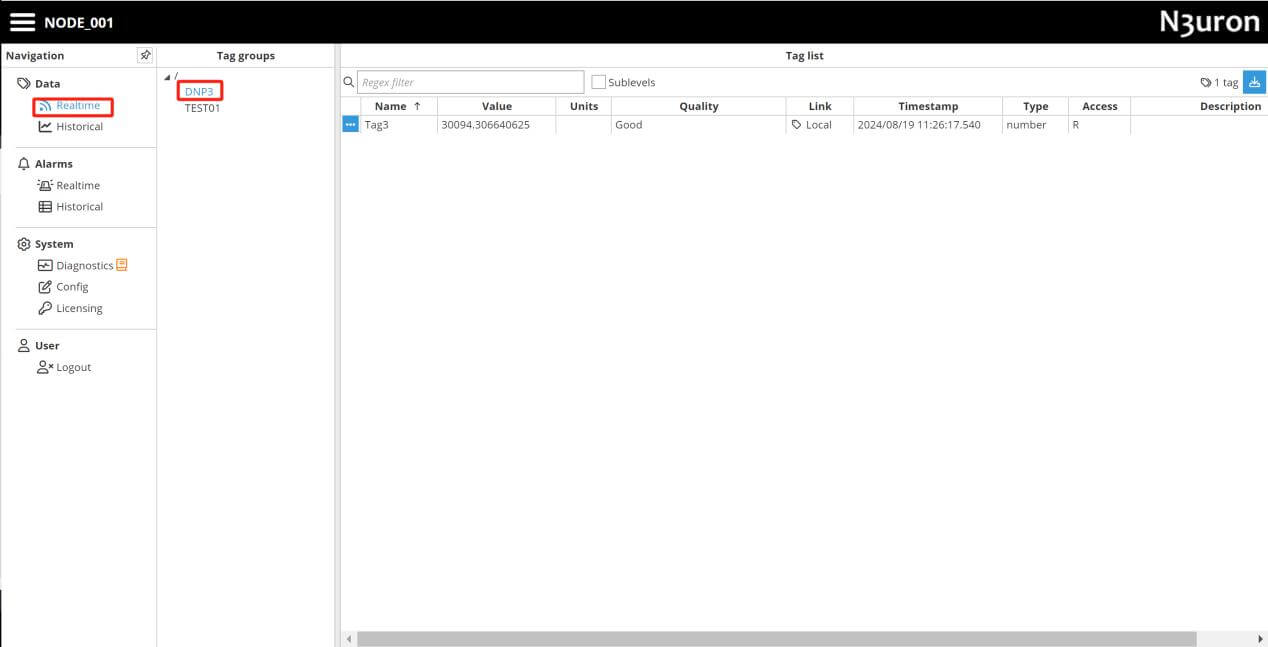
Back to N3uron, we can see the Real-time data by choosing Tag group:
5) Configure MQTT Client
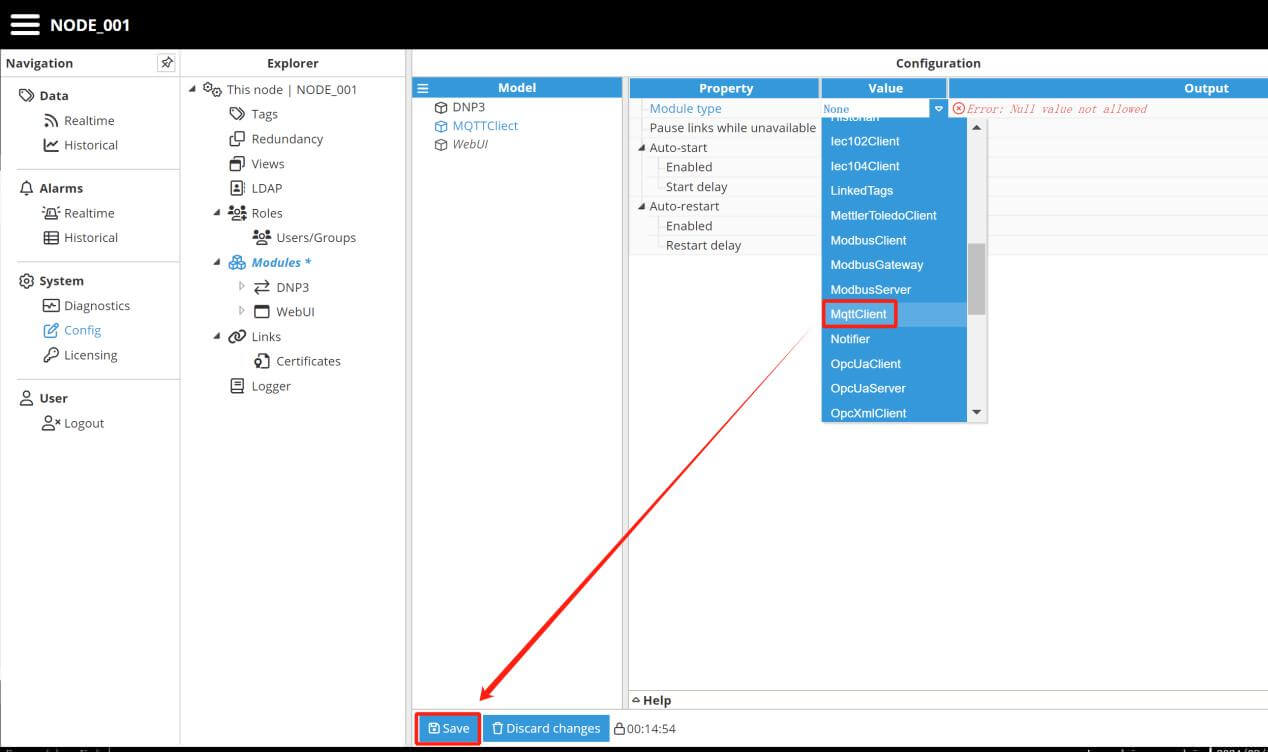
Step 1: Come back to Explorer, click Modules and create new model here, click Save button after select MQTTClient as Module type.
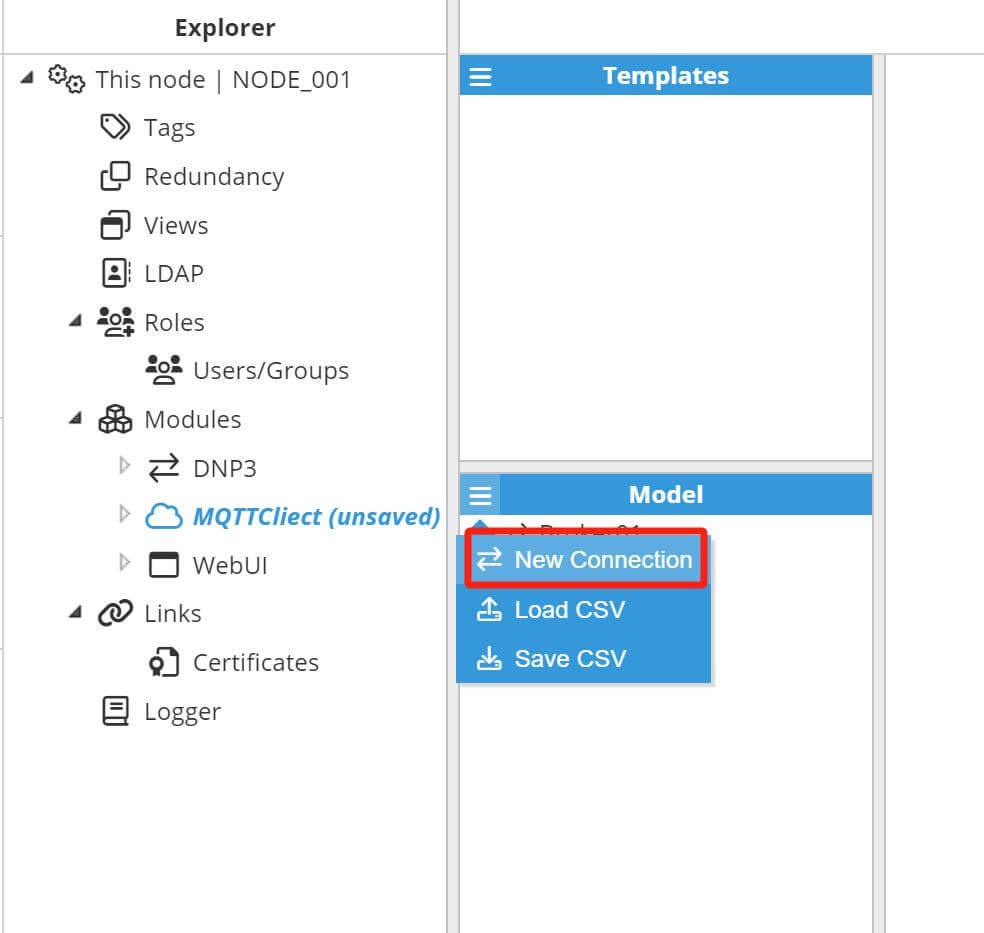
Step 2: Click on the newly created module and enter to its configuration, here we need to create new connection name it as Broker01.
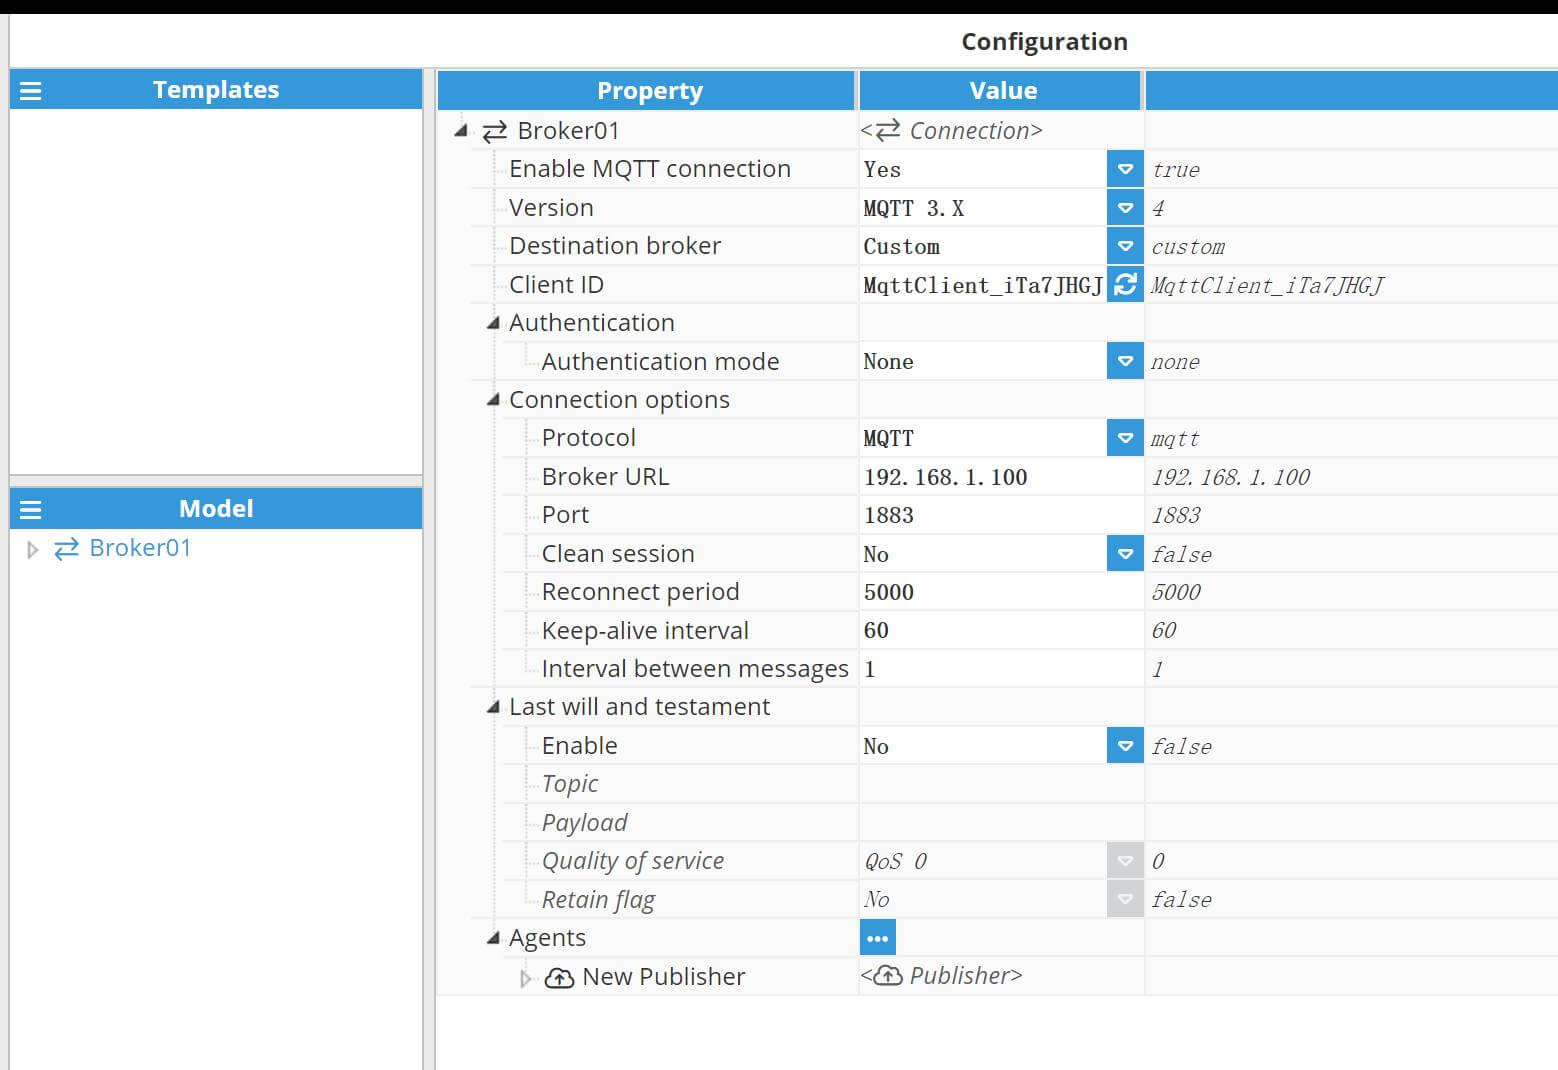
Step 3: Enter configuration of Broker01, we should setup the values follow the MQTT Broker settings.
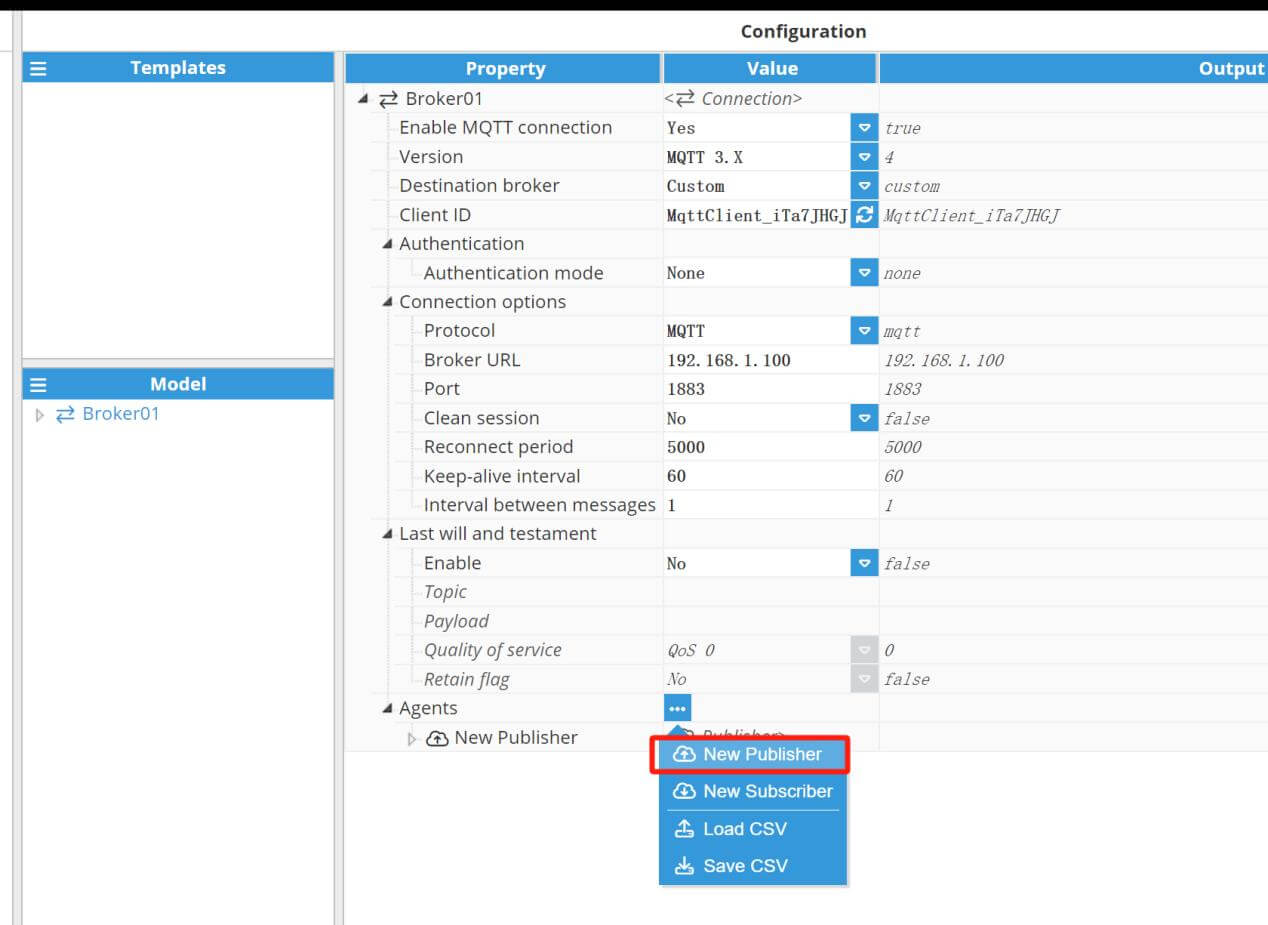
Step 4: Create a new Publisher by click of Agents, then setup Push interval, Topic etc.
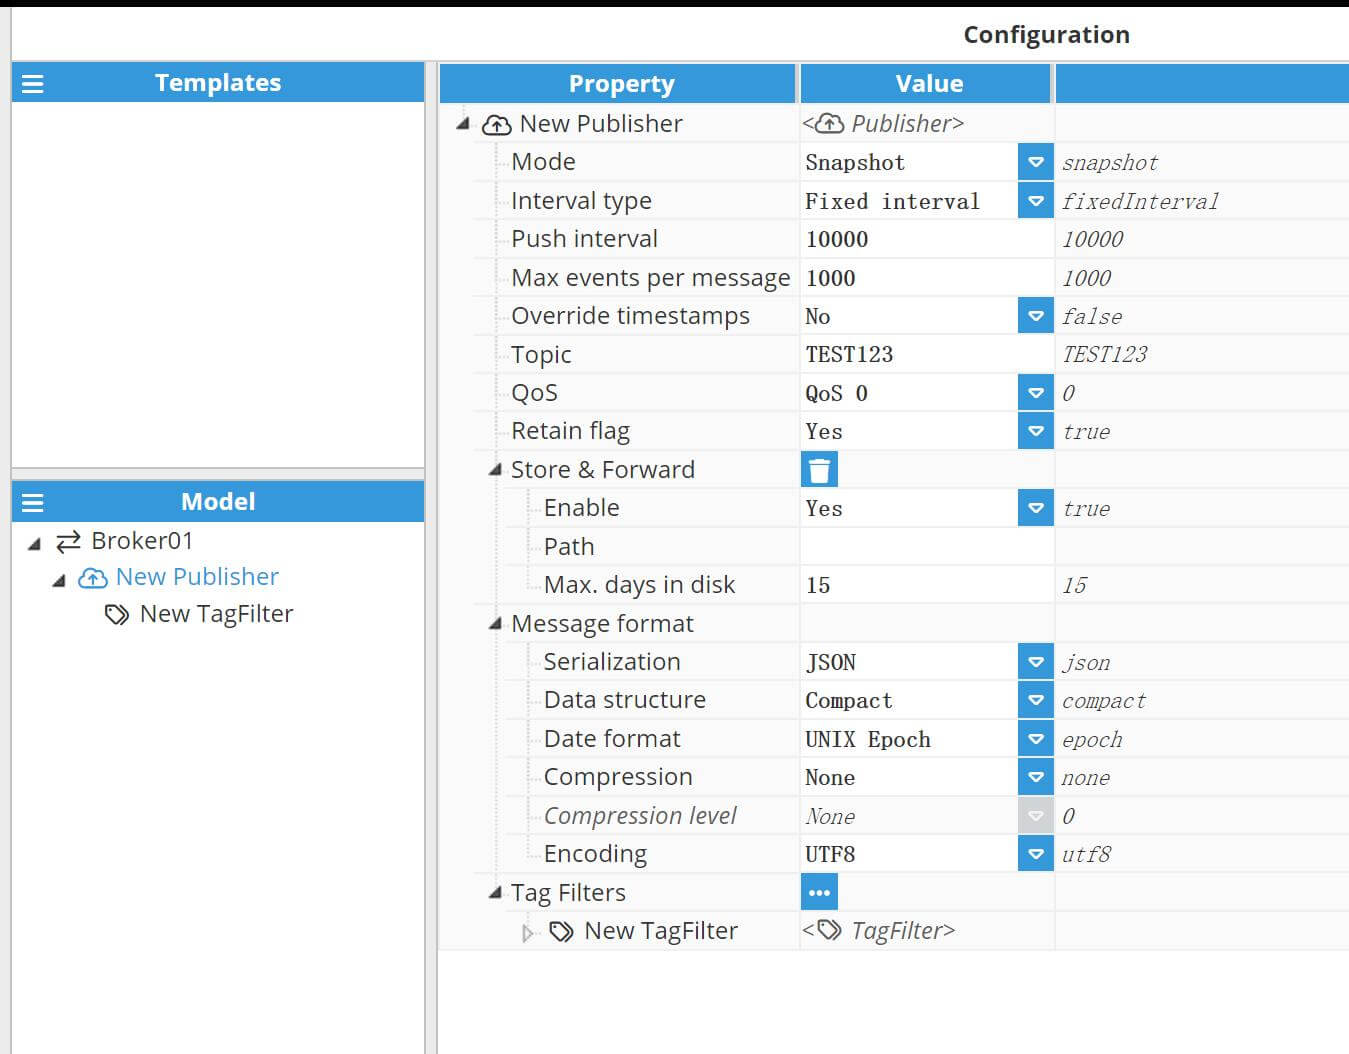
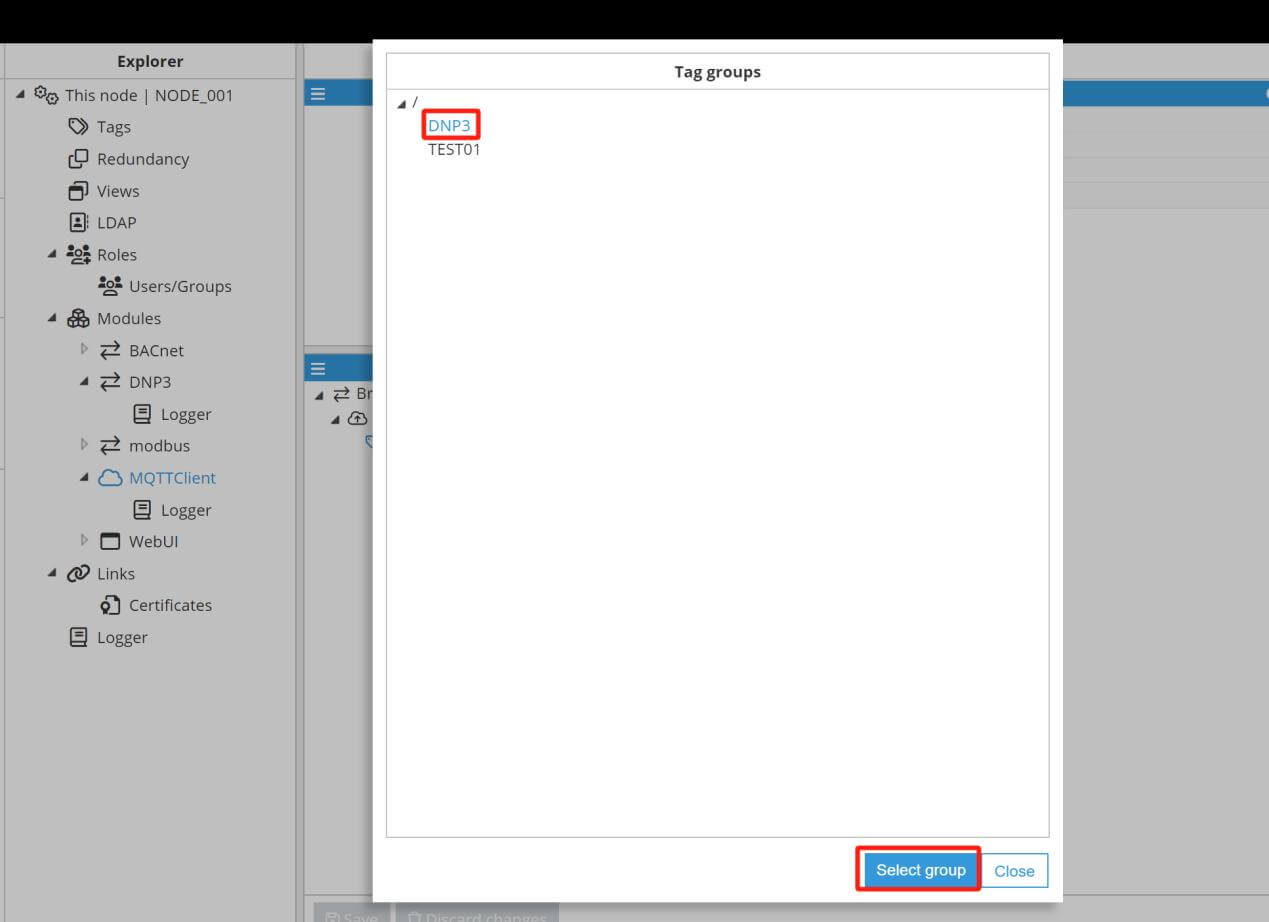
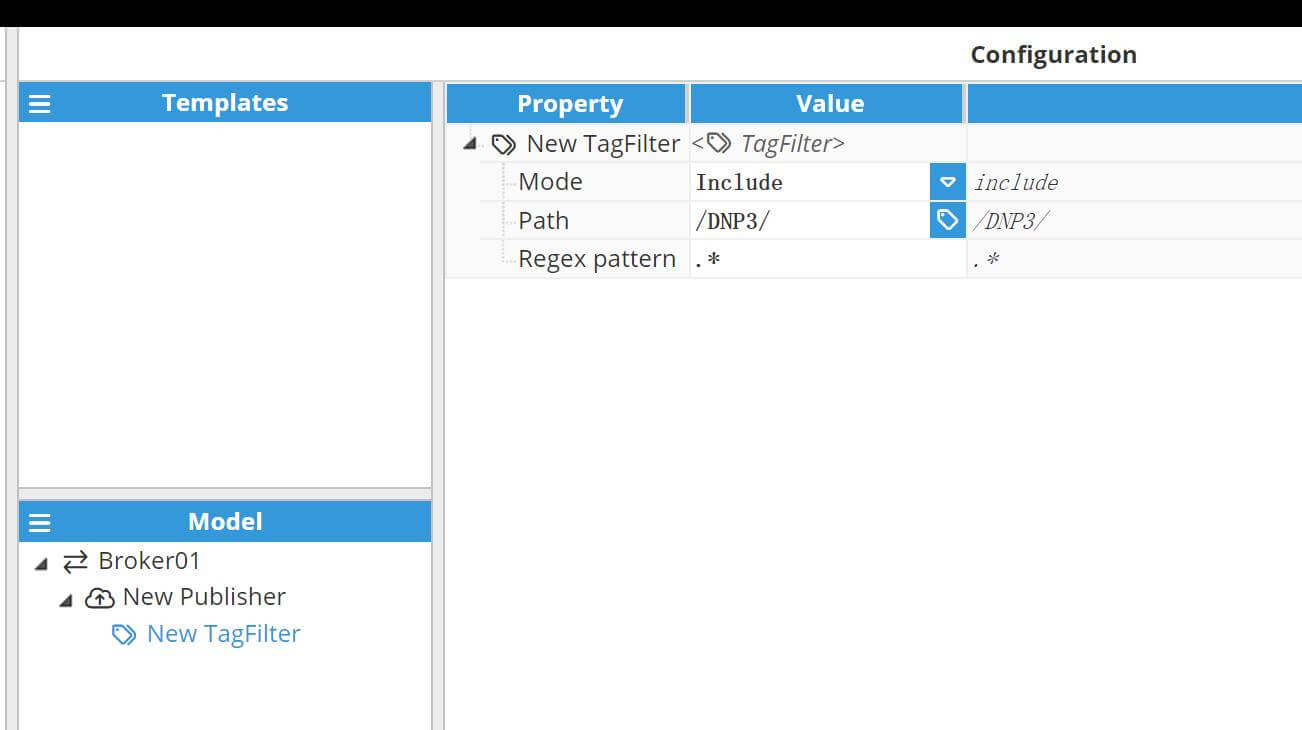
Step 5: Add new TagFilter, and select the Path we want to publish. Here we select DNP3, and then click on Save button.
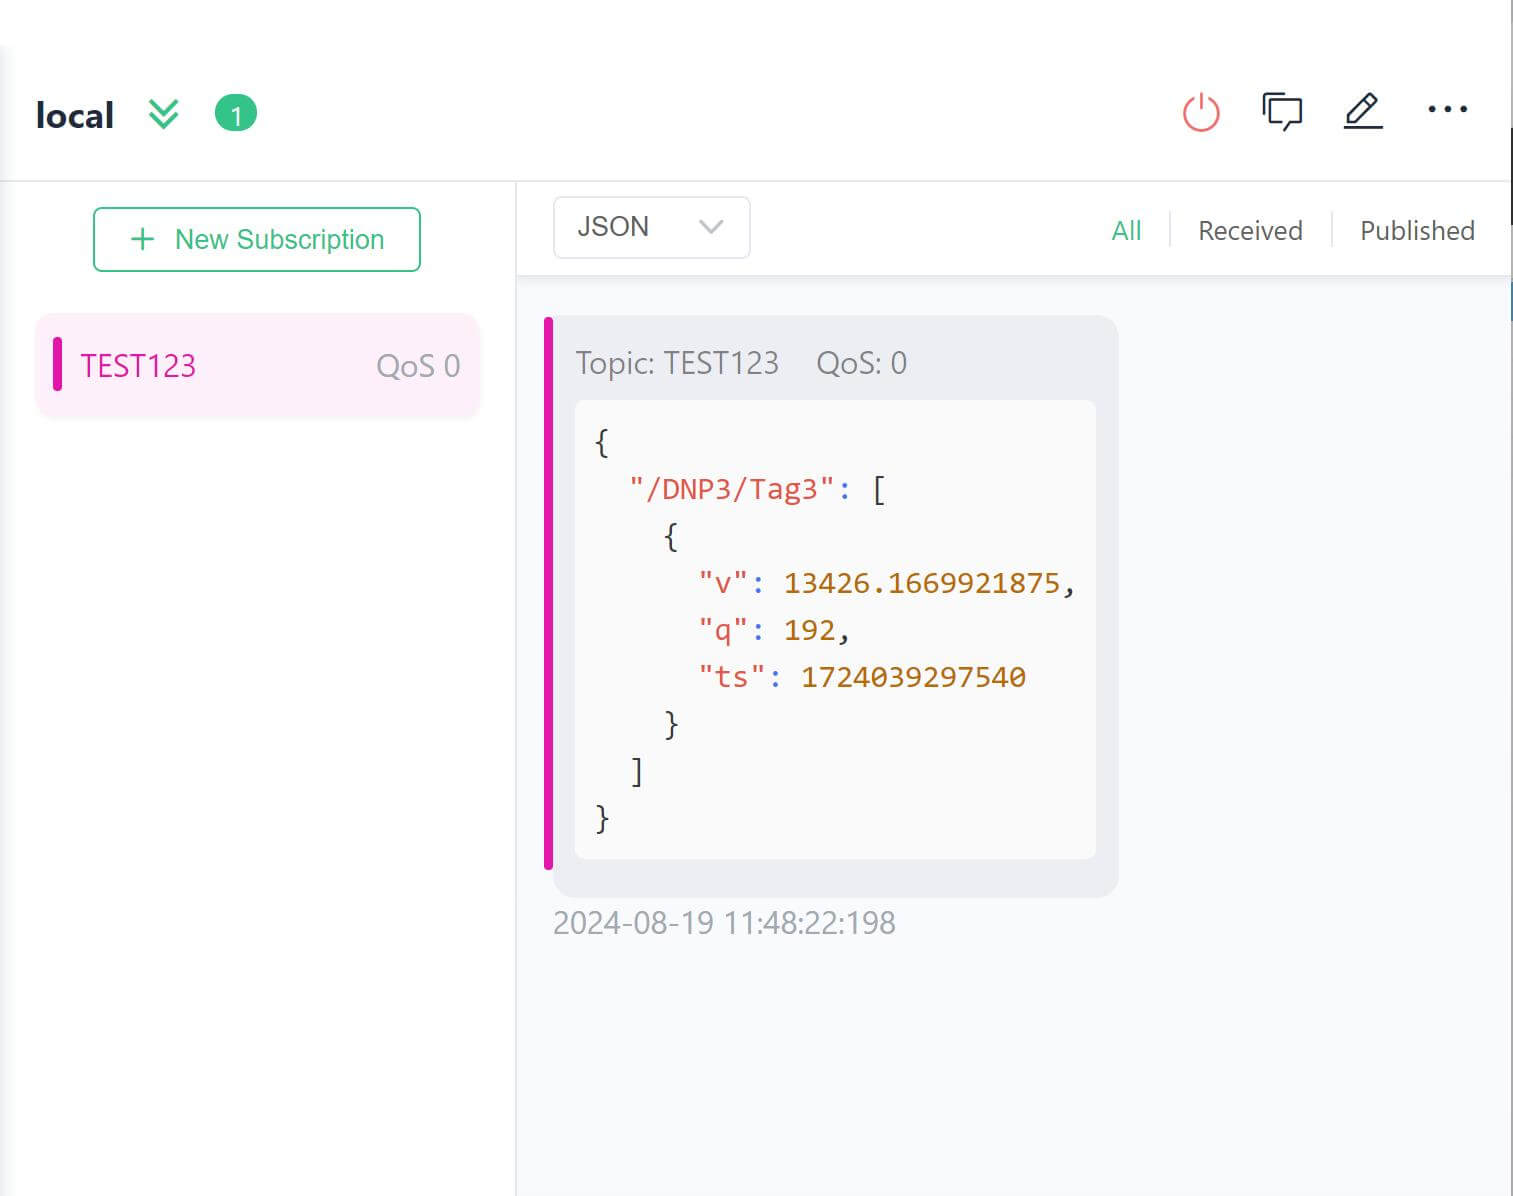
After a while, we can receive the message from DNP3 Client by subscribe the topic which N3uron published.
3. About N3uron
Founded in 2018 in Spain by System Integrators, N3uron Connectivity Systems is a software development company that provides cutting-edge industrial software solutions that enable organizations to manage their data effectively and efficiently while reducing technological and financial constraints.
Based on its extensive experience in designing and implementing IIoT solutions for various industrial sectors, N3uron Connectivity Systems developed N3uron, the first universal industrial Edge Platform for IIoT and DataOps. N3uron Software Platform serves a wide range of customers including Power & Utilities, Oil & Gas, Manufacturing, Building Automation and more.
Related link:Bivocom Partners with N3URON to Enhance IoT Solutions and Connectivity




Comment